Step 1
Log in to your Glow account and click on Settings from the main left hand menu.
Step 2
Next, click on White Label from the inner menu and then on the DNS Records tab.

Step 3
In the first form field, add your domain name, eg. myagency.com. As you type, you’ll see the right hand side of the second form field begin to populate.
Add a subdomain in the second form field. For example, if your domain name is myagency.com and you want to run Glow from app.myagency.com, you would add app into the subdomain box.

Click the Next button.
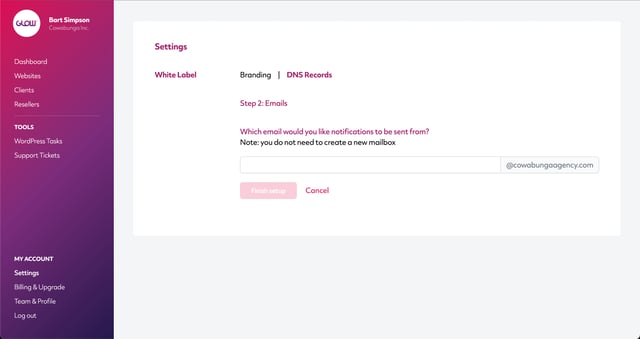
Step 4
On the next screen it’s time to tell Glow which mailbox you want email notifications to be sent to your clients from:
Your clients will:
- See this email in the
From field in their inbox when they receive email notifications
- Be able to send emails to this address as a way of raising support tickets to you (if you set that option to ‘Yes’ in the next step)
So, if you want the mailbox to be [email protected], then you’d add help into the form field:

Step 5
Below the email field you’ll now see another question, asking if you want your clients to be able to raise a ticket by sending you an email.
Select Yes if you do want them to be able to do this.
Select No if you don’t want them to be able to do this.
If you choose No, your clients will need to login to their account to raise a support ticket to you and you can move down to Step 6 below.
If you select Yes, you will see a new section appear below.

Follow the instructions showing to setup a forwarder on your email address. This is what will allow your clients to raise support tickets by sending an email to you.
Now click the Finish setup button.
Step 6
Glow will now create the DNS records. This will take a few seconds.
When complete, you’ll be shown the DNS records that you need to add to your registrar.
Note: You have 24 hours to add the DNS records to your domain registrar so we always advise that you add them immediately. If you wait longer than 24 hours before adding them, they will not work. At this point, the DNS section will need to be reset and you’ll need to start the process again.

Before you do this, the status at the top of the screen will show as Not connected.
It will remain like this until you have added the 6 DNS records and they have propagated fully.
So, add the records now and then come back to this screen and click the Finish button at the bottom.
Note: Domain registrars differ in how they want you to add DNS records. If you’ve added your DNS records and Glow is still showing the Not connected status, it’s likely that there’s an error with the way the records have been added to your registrar. To be sure, first contact your domain registrar and ask them to check you’ve definitely added the records correctly. If you’re still have trouble after doing this, contact our support team.
Step 7
You’ll then see a success message, confirming that your DNS records have been added and that it can take up to 24 hours for them to fully go through.
Step 8
Once the connection process has completed, the DNS Records screen will show the Connected status and you and your clients will then be able to log in to your account on your domain.
Note: Occasionally, you might see the Connected status in Glow, even though the SSL certificate is not yet connected in the browser. If you’re using Cloudflare, try switching to the Cloudflare SSL. This will fix the issue in most cases. If you’re not using Cloudflare, drop a message to our support team and we’ll take a look.

